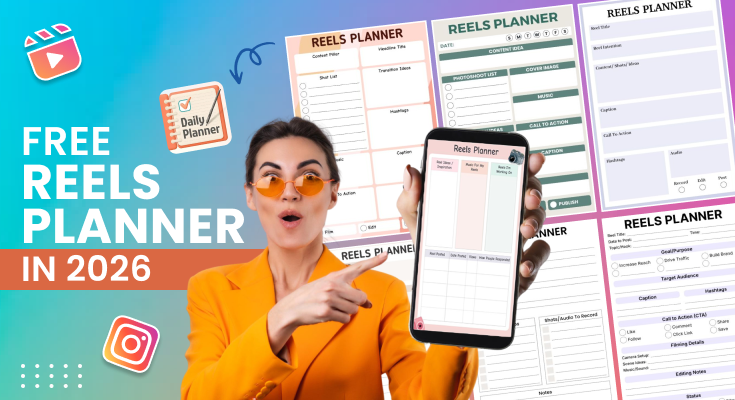
When it comes to coming up with content for Instagram Reels, it is not just about coming up with something creative but also being organized. If this is not organized, coming up with content will be a reaction that will be disorganized. This is where a Reels Planner will come in handy.
Reels Planner is an effective tool for planning content, planning shots, planning the dates for recording, and viewing what has been posted and what will be posted later. This means that, as opposed to making decisions on what to post outside when it is at the last minute, decisions have now been made with the aim of meeting objectives and goals, as well as being able to reach the target group with the help of the Reels Planner on Instagram. It is, therefore, possible to save time with the help of the Reels Planner feature on Instagram.
What Is a Reels Planner?
A Reels Planner is a tool for organizing your content with planning, organizing, scheduling, and tracking your Instagram Reels in advance of when you will require them. It is more of a Command Center where all you must do with regard to planning your Reels is organized in one single space.
Consider the difference between writing code based on the components you happen to find in the fridge of your code environment, instead of a recipe for the application you want to build that lists the components needed.
An effective Reels planner will have the following components:
- A content calendar to view your posts every month.
- Bank of content ideas sorted by theme or category
- Caption library and hashtag library to copy and paste
- Forms for tracking performance in what works
- Making videos of checklists to prepare for batch creation sessions
Scheduling posts for optimal times based on your target group. Whether digital or printable, a Reels planner helps keep everything organized, so you don’t have to spend time thinking about what to post. Using the digital journal alongside your Reels planner can help you reflect on what content resonates with your audience and refine your strategy over time.
Why Every Content Creator Needs a Reels Planner?
Most content creators respond reactively to the challenge of posting reels by scrambling to create content every time they remember that a few days have elapsed since the last posting.
Reel planning makes all the difference. This is because the use of a planner makes such a big difference in the following ways:
Saves 5-10 Hours Every Week
Without a planner, you could waste time on:
- Staring at a blank screen, wondering what to post
- Looking for trending audio to accompany your video recording
- Creating altogether different captions for every Reel
- Trying to recall which #hashtags were successful
- Determining when you last shared content and when you should share it again
A planner eliminates this daily decision fatigue. You’ve already thought out your content, so all you have to do is follow what’s in your planner. Those saved hours add up to hours weekly. Weekly planner templates can help you map out your content batching sessions and track your posting schedule efficiently.
Your Content Actually Gets Better
When you’re rushing to hit publish at 11:58 PM because you “have to post today,” yeah, it shows. Your intro doesn’t grab anyone. Sentences are awkward. And you’re sitting there like, “Did I even make sense just now?”
Planning enables one to look ahead to:
- What Should Be the Message in Each Reel
- Structuring Content to Enhance Retention
- Which hooks will work well with stopping the scroll function?
- What call-to-action drives the behavior you want
Better planning directly translates to better-performing content. Using a daily task journal to track your content ideas and refine them before filming ensures each Reel is purposeful and strategic.
Ensures the consistency of Instagram Rewards
Instagram’s algorithm in 2026 favors regular postings. Pages that post at regular times and days perform better than the ones that post randomly.
The data is clear:
| Posting Frequency | Typical Monthly Reach | Algorithm Priority |
|---|---|---|
| Sporadic (random timing) | 1-2x follower count | Low |
| Consistent (regular schedule) | 3-5x follower count | Medium |
| Consistent + Strategic (optimized times) | 5-10x follower count | High |
A planner makes consistency automatic. You’re not relying on memory or motivation; your schedule is documented and ready to follow. Monthly schedule planner templates give you the big-picture view needed to maintain that consistency and spot gaps in your content calendar before they become problems.
Reduces Creator Burnout
The pressure to constantly create content is real. Many creators burn out trying to post daily without a system.
A planner removes that constant pressure because:
- You batch-create content in dedicated sessions, not daily
- You have backup content ready when life gets busy
- You know exactly what to film, eliminating creative paralysis
- You can take breaks without your account going silent
Planning turns content creation into something you can actually sustain instead of this thing that slowly drains the life out of you. Without it? You’re just grinding through each day, hoping you don’t completely burn out.
Helps You Actually Grow
Random posting yields random outcomes. By planning, one can strategically:
- Varying the information presented to the user by including different
- Launching or promoting the product
- Writing content related to holidays and trends
- Testing various approaches systematically
- Tracking what works so you can do more of it
Growth is achieved by being strategic, not by accident. Having a planner helps one be strategic. Business planner templates can help you align your content strategy with broader business goals and track the ROI of your social media efforts.
How to Use a Reels Planner Effectively?
Just having a template for a planner is one thing; using it to the fullest constitutes a whole other deal. Here’s how successful creators will plan Reels in steps:
Step 1: Define Your Content Pillars – Setup Once
Content pillars are 3-5 evergreen topics that provide Reels with some variation yet still help to maintain brand consistency. Without them, you’d be left with nothing every time you have to generate content.
How to choose your pillars:
- The Key is to Find your Strengths: What skills or knowledge do you possess is what people are really clamoring to learn?
- Ponder the struggles of your target group: What are the problems for which they require solutions?
- Analyze content from the competition: “What kind of content are the people you want to connect with most interested in on the web?”
- Test for sustainability: Could you create 20+ Reels for each pillar?
Example pillar sets by niche:
| Niche | Pillar 1 | Pillar 2 | Pillar 3 | Pillar 4 | Pillar 5 |
|---|---|---|---|---|---|
| Fitness Coach | Short exercise routines | Nutrition advice | Transformations | Calling out BS health myths | Behind-the-Scenes |
| Small Business | Product Demos | Customer Stories | How-To Tutorials | Company Culture | Industry Tips |
| Beauty Creator | Makeup Tutorials | Product Reviews | Skincare Routines | Get Ready With Me | Beauty Hacks |
| Food Blogger | Quick Recipes | Cooking Tips | Restaurant Reviews | Kitchen Hacks | Food Trends |
Once defined, color-code each pillar in your planner so you can visually balance content types.
Step 2: Come Up with Content Ideas for the Pillars
Now that you have your pillars, create 10-20 different ideas about reels. Yeah, I’m giving you a huge assignment, and it will be around 50-100 ideas, which will make you good from Sunday night, thinking,“ What am I going to post tomorrow?” You will be good.
Ways to actually brainstorm this stuff:
- Answer the questions your audience frequently asks
- Adapt trending formats to your niche
- Show behind-the-scenes of your process
- Create tutorials teaching your expertise
- Share before/after transformations
- Respond to comments or DMs with video answers
- Break myths or misconceptions in your field
- Share personal stories related to your topic
Capture all ideas in your planner’s idea bank section, organized by pillar. Never run out of content again. Notes planner templates are perfect for capturing these brainstorming sessions and organizing ideas by pillar so they’re ready when you need them.
Step 3: Plan Your Monthly Calendar
Open your monthly calendar view and decide:
Posting frequency:
- New to the Platform: 2 to 3 per week
- Consistent Creators: 3-4 Reels per week
- Growth-oriented: 5-7 Reels per week
Posting days and times:
- Check your Instagram Insights for when YOUR audience is active
- Posting should be done during the optimal times
- Post on the same days of the week (Monday/Wednesday/Friday, etc.)
Content pillar balance:
- Rotate through your pillars to maintain variety
- Don’t post three educational Reels in a row
- Balance entertaining content with valuable information
Mark your calendar with:
- Which days are you posting
- Which content pillar each Reel belongs to
- Key Dates (Holidays, Launches, Events)
- Gaps where you must fill in the content
Step 4: Plan Weekly Content in Detail
Take your monthly plan and break down each week with specific details:
| Planning Element | What to Include |
|---|---|
| Topic/Concept | Specific subject (not just “tutorial” but “5-minute natural makeup routine”) |
| Hook | Your first 3 seconds that stop the scroll |
| Key Points | Main beats you’ll cover in the Reel |
| Audio Choice | Trending sound or original voice-over |
| Caption Framework | Which template do you use from your library |
| Hashtag Set | Which group of hashtags fits this content |
| Props/Materials | What you need for filming |
This detailed planning makes filming day smooth and efficient, so you’re not figuring out what to say when the camera starts rolling. Schedule maker helps you organize these detailed elements for each piece of content and ensure nothing gets overlooked during production.
Step 5: Batch-Create Your Content
Set aside dedicated time blocks for filming multiple Reels at once:
Pre-filming preparation:
☐ Review your weekly plan
☐ Write bullet points or scripts for each Reel
☐ Gather all props and materials
☐ Plan outfit changes for variety
☐ Charge devices and clear storage
☐ Choose filming locations
During the filming session:
- Set up the lighting and camera position once
- Film all the reels that work in this setup
- Change outfit, location, or angle between batches
- Film 2-3 takes of each for editing options
- Check off each Reel as you complete it
After filming:
- Schedule separate editing time (don’t film and edit in one exhausting session)
- Add captions from your template library
- Schedule posts at your optimal times
Step 6: Monitoring the outcome and making improvements
After each post of a Reel record, the following key metrics are in your planner:
- Views after 24 hours
- Total reach
- Watch time percentage
- Saves (high-value engagement)
- Shares (exceptional value indicator)
- Comments
- Profile visits
- New followers gained
Review this data monthly to identify patterns. Create more content like your top performers. Eliminate approaches that consistently underperform. Mood tracker templates can also help you notice correlations between your energy levels, creative mindset, and the performance of content you create on different days.
What are The Reels Planner Templates for Planning?
Since you now know how to use a Reels planner, it is essential to highlight the different pre-design planner templates that can save you the time of creating all the elements by hand.
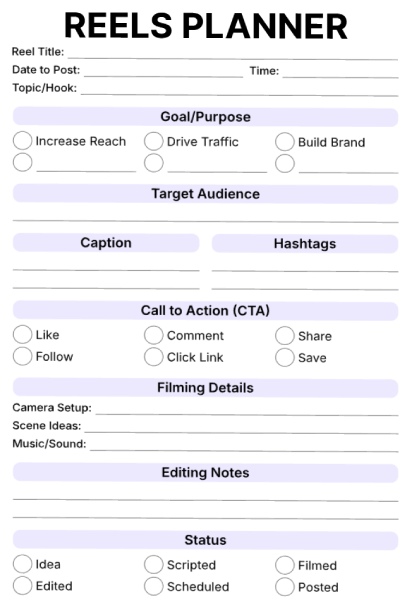
Template 1: Digital Marketing Reels Planner
This all-in-one reels planner outlines every element of your Instagram or TikTok content creation from beginning to end. You can enter the title of your reel, the date and time of your post, and your theme or hook. There are fields where you can determine your goal, such as increasing awareness, sending traffic, or establishing your brand, as well as where you can determine your target audience. There are fields where you can write your caption and your hashtags, in addition to where you can check other options for calls to action, such as encouraging your viewers to like your content, leave a comment, or click on a link. The section for video details allows you to plan your camera angles, shots, or even your music, along with where you can write your edit ideas.
Best for: Social media managers, content developers, and influencers who are keen on planning their reels and tracking the entire process right from concept creation to publication.
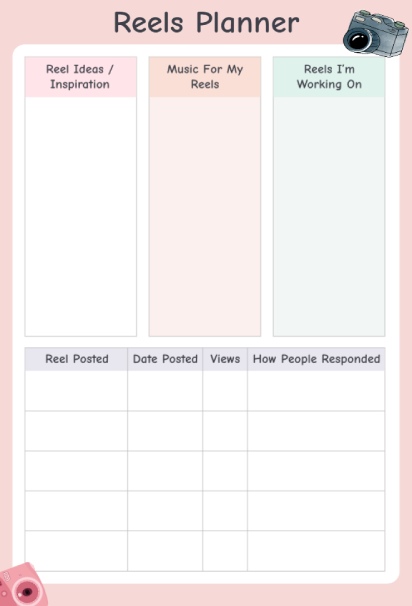
Template 2: Reel Production and Strategy Planner
This Reels Planner helps you organize the three most important parts of content creation using a simple three-column layout. In the first column, you can quickly note down ideas and inspiration whenever they strike. The middle column lets you list the music tracks you plan to use for your reels, while the third column focuses on the reel you are currently working on. Below these columns, a tracking table helps you monitor your progress. You can record when you posted each reel, the posting date, view count, and audience response. This setup makes it easier to stay consistent, review performance, and improve future reels. That soft pink aesthetic with camera illustrations makes planning feel creative and fun rather than like a chore.
Best for: Content creators looking to monitor their performance on reels over time and understand the type of content and music options that yield the most engagement from target audiences.
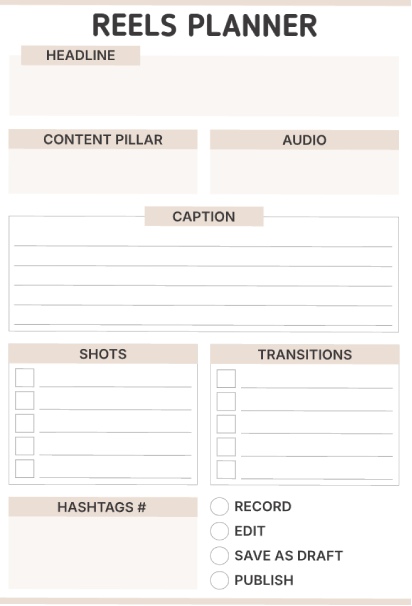
Template 3: Social Media Reels Creation Planner
This production-oriented planner helps you unpack the technical side of building your reel. You can begin by filling out your headline, content pillar, and audio selection, which serves as your groundwork. There is enough room to fully write out your publication’s caption using multiple lines. The shots and transitions area allows you to check off boxes for all the scenes and/or transitions you are intended to record. Hashtags can be written out, and you can use status circles to determine when you’re ready to record, edit, save, or post. The beige background allows your planning to be the main emphasis.
Best For: Video creators and filmmakers who approach reels with a more structured, shot-by-shot production mindset and want to ensure nothing gets missed during filming.
Template 4: Comprehensive Content Reels Development Planner
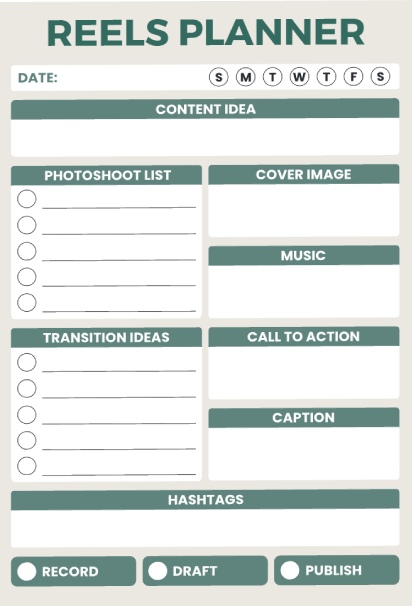
This organized planner uses a clean green and white color scheme to guide you through reel creation. At the top, you pick your day of the week and write your content idea. The photoshoot list section with circles helps you plan and check off the clips or shots you need to capture. There are dedicated boxes for your cover image, music selection, call to action, and caption. The transition ideas section lets you list different cuts or effects you want to try. At the bottom, you can see your hashtags area and buttons for your status, which indicate the record, draft, or publication stage your reel is in.
Best For: Organized content creators who prefer a structured and step-by-step process of planning reels with defined visual areas designated for every aspect of the creation process.
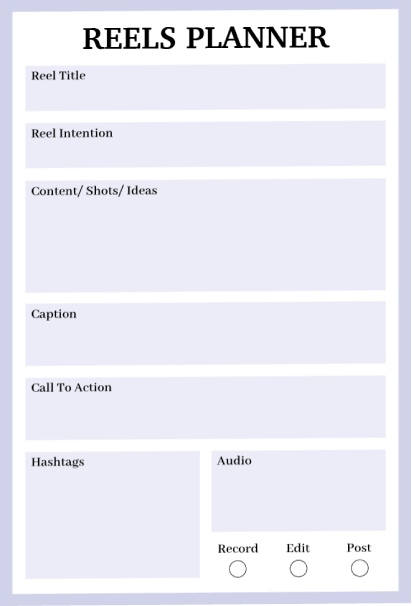
Template 5: Social Media Reels Content Strategy Planner
This minimalist planner keeps things simple with clean purple and white sections. You start by writing your reel title and intention to clarify your purpose. The content, shots, and ideas section gives you a large space to brainstorm freely without too much structure getting in your way. Below that, you’ll find separate areas for crafting your caption and writing your call to action. The bottom section splits into two boxes for hashtags and audio notes, with three circles at the very bottom to mark whether you’re ready to record, edit, or post. The simple layout means less time planning and more time creating.
Best For: Creators who prefer a minimalist approach without too many boxes and checkboxes, perfect for quick planning sessions or when you want flexibility in your process.
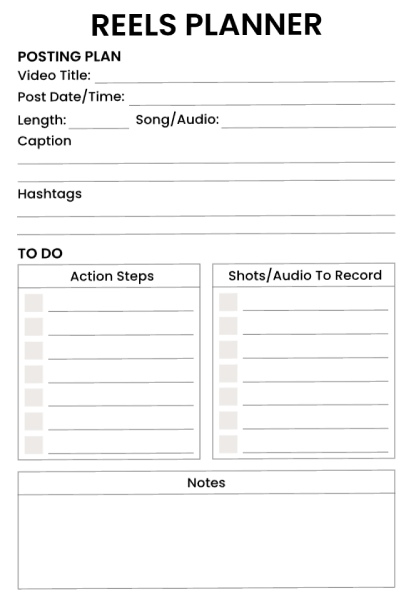
Template 6: Organized Reels Creation and Posting Planner
This to-do planning pad is aimed at the logistics of getting your video onto your reel. That is the entry of information associated with the post at the top of the page. That would include the name of your video, the date and time of when a post is to go through, the time of the post, and the music or audio in the recording. There is room to enter information associated with the post in terms of the caption and associated hashtags. The to-do list is divided into two helpful categories. The first is information that the user needs to have before they make their post. In the second column are things the user needs to record. There is room at the bottom of the page associated with notes.
Best for: Content marketers or small business owners who are busy and have to generate content in large volumes to schedule postings.
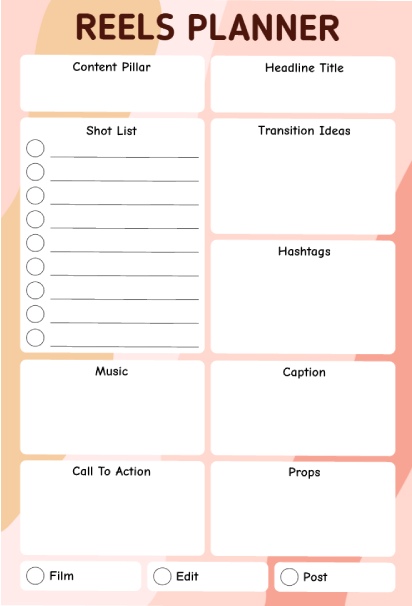
Template 7: Social Media Reels Content Creation Planner
This planner uses a grid format to divide all your details into neat squares across the page. You divide your content column, headline title, shot list, circled options on the left, transition ideas, hashtags, music selection, write your caption, call to action, and your props on the right side. The peach pink background and abstract watercolor art give this planner a creative look. The last section is taken up by edit, shoot, and post options using three squares at the bottom.
Best for: Visual planners or entrepreneurs who like to organize the elements of their reels into a grid format where each element takes up a spot of its own.
Frequently Asked Questions
A Reels Planner is a planning tool that will enable you to organize Reels content in an electronic or printable format. This is necessary because planning will save you from the daily struggles of deciding what to post, an estimated 5-10 hours a week of precious time, and will give you higher-quality content because you are not rushed. With a planning tool, the content you will use in the weeks ahead will have been planned.
This will let you see that you can get the best combination of prep and adaptability. This will let you plan sufficiently so that you can maintain continuity if you realize that life has been busy, but still let you pounce on trends when you notice an opportunity. Planning out a whole month at one time can be overwhelming if you’re new to this. Planning a whole month might work for experienced writers, but it can be too much if you’re new to content creation.
Pick which option suits you better according to your working style. Digital Planners: These are best suited for you if you: Wish to access it from any device. Want to edit it an unlimited number of times. Have team members with whom you want to share. Want an eco-friendly tool. Printable Planners: These tools are best suited for you if you: Want to plan through pen and paper. Wish to minimize screen time. Want a visual reference that is stuck to your wall.
The answer is: Yes, you can very conveniently print any planner that you may have created in PlanWiz. All that needs to be done here is that your template then needs to be exported in the form of a high-quality PDF, which can then be conveniently printed from your own home using your own printer or even sent to a professional printing press for better quality. The trend set by most planners is that they are stored for editing on the cloud.
Yes, planners work excellently for team collaboration. Digital planners can be shared via cloud services so multiple people can view and edit. For agencies managing multiple clients, create separate planners for each account. Use your planner to assign tasks (who’s filming, who’s editing, who’s scheduling), track approval workflows, and maintain communication about content strategy. Add a notes section for team feedback and ideas.
Conclusion
The difference between people who have long-term success as content creators versus people who end up burned out is planning. Not perfection. No fancy gear. Not talent. Just showing up to avoid the “what am I going to create today?” anxiety.
You don’t have to change your content strategy wholesale tomorrow morning. You don’t have to break the bank on software and staff. All you need is to go through this list and choose one template, carve out 30 minutes this week, and plan the next seven Instagram Reels you post.
Make it happen:
- Download a template that you feel you can manage, keep it straightforward, “keep it simple…”
- Create Your 3-5 Content Pillars to Ensure You Never Have to Write to a Blank Screen Again
- Make Reels in sets of 3-4 at a time rather than struggling every day.
- Record what is effective and pursue it.
The content creators who succeed on Instagram in 2026 are the ones who post randomly whenever the idea hits them. Rather, it will be the people who have strategized and modified based on not guesses, but facts.
There are tools like PlanWiz that can make it even smoother with content calendar templates, team collaboration tools, and cloud accessibility. Whether you choose online tools or printable templates, it is less about the system that you use and more about you committing to using it.